Creating a Leap Project in Flow Builder
Available to Leap Organization Admin and Salesforce Admin
In this tutorial, you will learn how to prepare a Salesforce Flow that can create a new Leap Project. To make the tutorial easy to follow, the Flow will be a simple one; the flow starts from a screen that asks for required information needed to create a Leap Project.
Step-by-step
Prerequisites
Before we build a new Salesforce Flow, let’s prepare several required items:
A Leap External API Key.
This key allows you to access data in your Leap Organization fromA Named Credential.
This credential allows your code in Salesforce to connect to Leap.An Apex Class that can create a new Leap Project.
This will be the code that your Salesforce Flow use to call Leap’s External APIs and create a Leap Project.
Generate a new Leap External API Key
1. Open Documill Leap web app.
2. Go to Organization page.
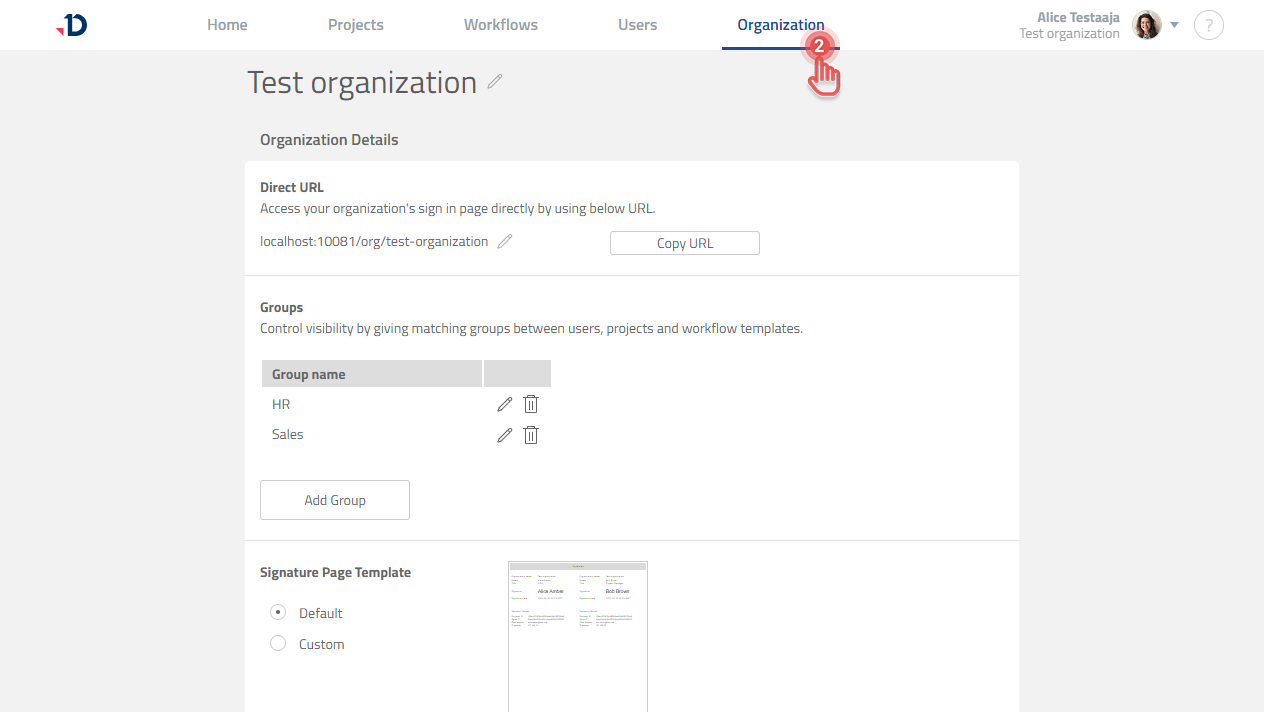
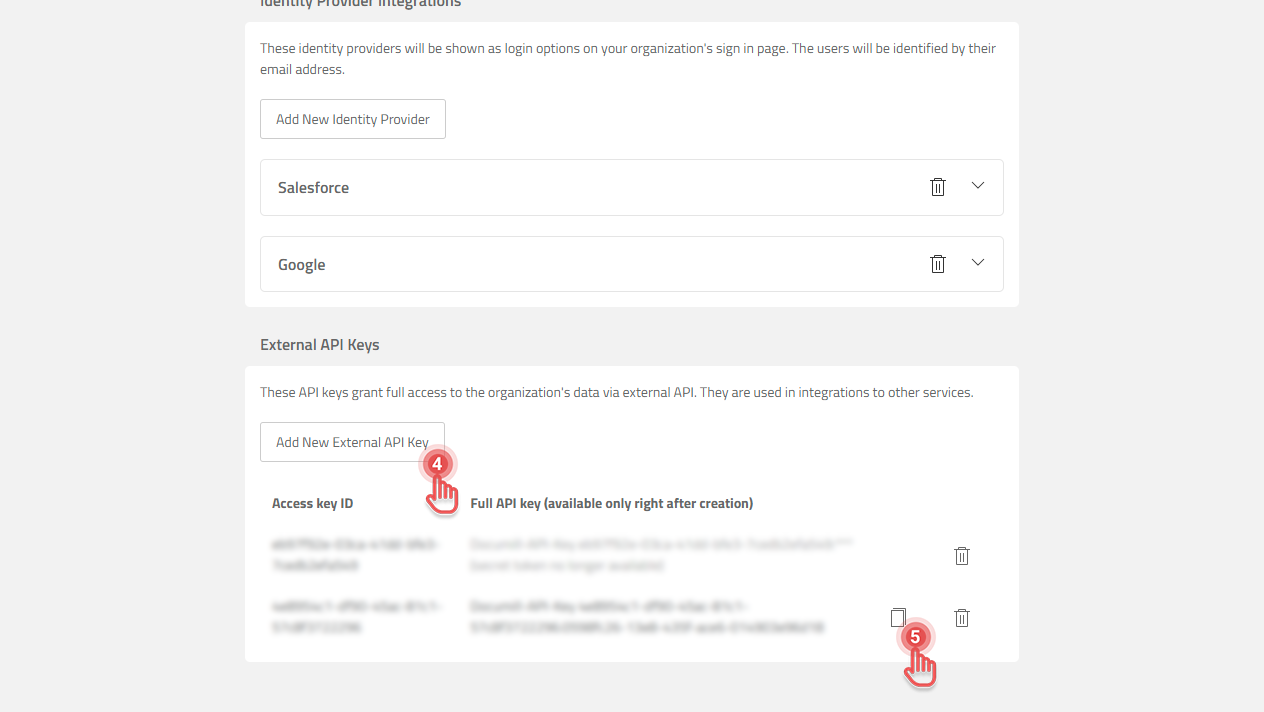
3. Scroll down to External API Keys section.
4. Click [Add New External API Key] button.
5. Copy the “Full API key” as we will need it in the next part of this tutorial.
Create a Named Credential to access Documill Leap’s API
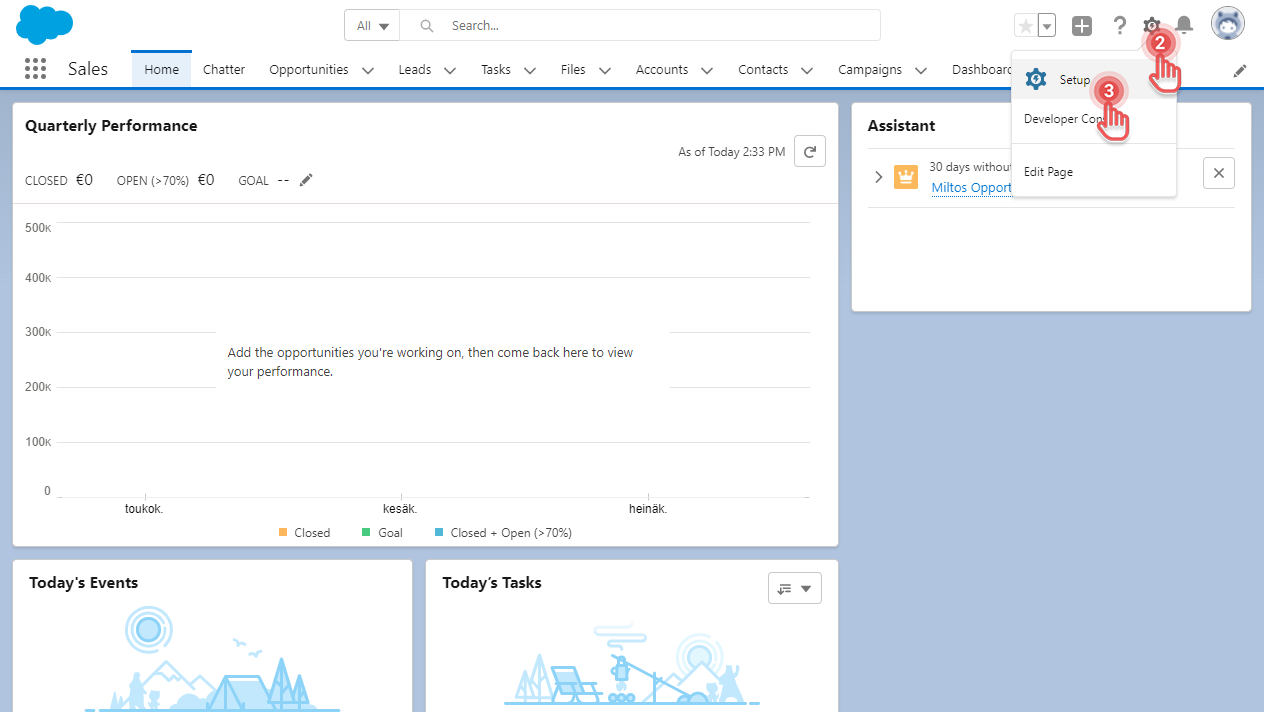
1. Open your Salesforce organization.
2. Click [⚙] button on the top right corner.
3. Click [Setup] option.
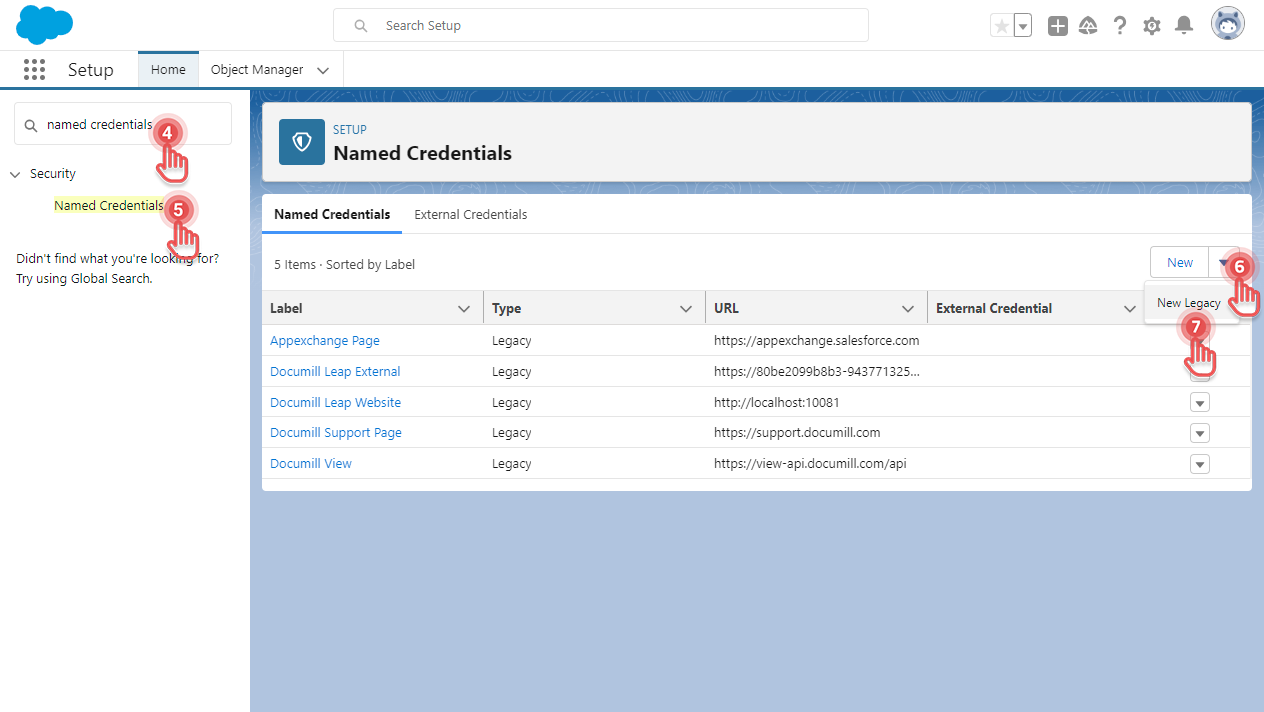
4. In Setup page, search for “named credentials”.
5. Click the Named Credentials entry.
6. In Named Credentials page, click [▼] button
7. Click [New Legacy] option.
8. Complete the details of the new Named Credential as follow:
Fields | Values | Explanations |
|---|---|---|
Label | Documill Leap for Flow | This value can be adjusted as needed. |
Name | Documill_Leap_for_Flow | This value can be adjusted as needed. Copy this value as we will need it in the next part of this tutorial. |
URL | https://api.leap.documill.com/api | |
Identity Type | Named Principal | |
Authentication Protocol | Password Authentication | |
Username | LeapExternalAPI | |
Password | <Leap External API key> | Put the Leap External API Key that was generated in the previous section of this tutorial. |
Generate Authorization Header | OFF | |
Allow Merge Fields in HTTP Header | ON |
9. Click [Save] button.

Write an example Apex class that can create a new Leap Project
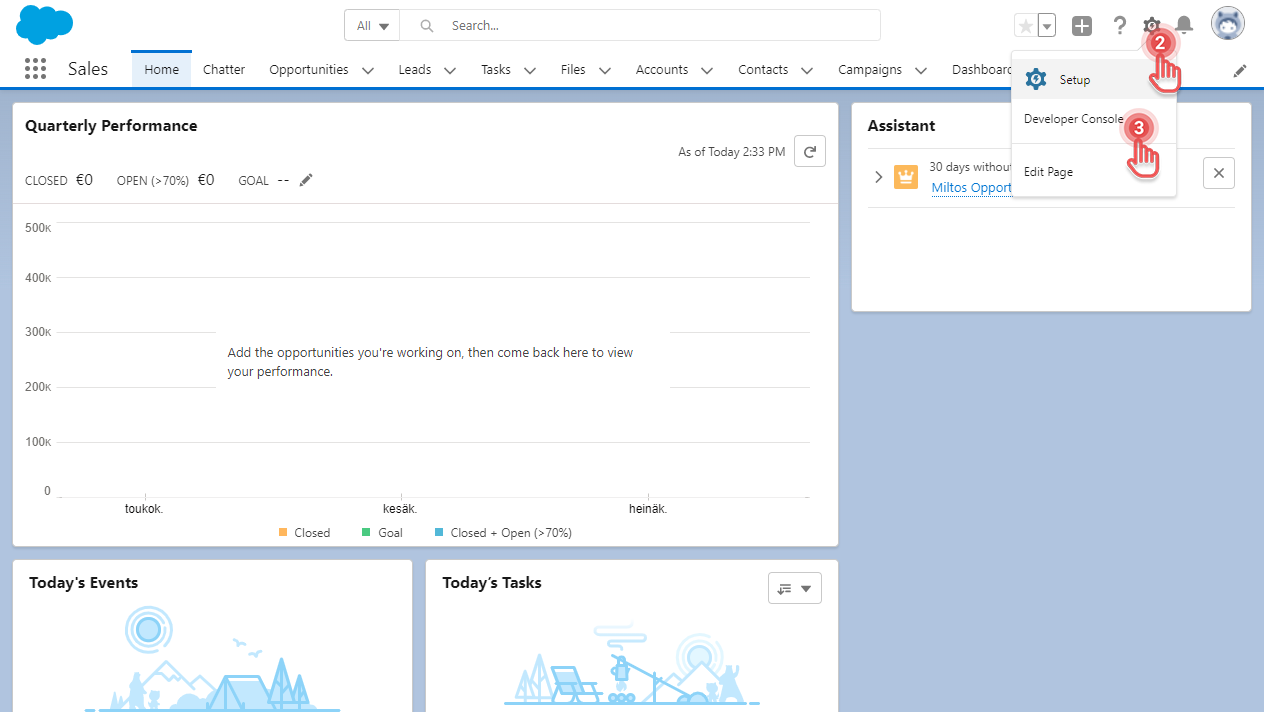
1. Click [⚙] button on the top right corner.
2. Click [Developer Console] option. Developer Console will be opened in a new window.
3. Click [File] > [New] > [Apex Class].
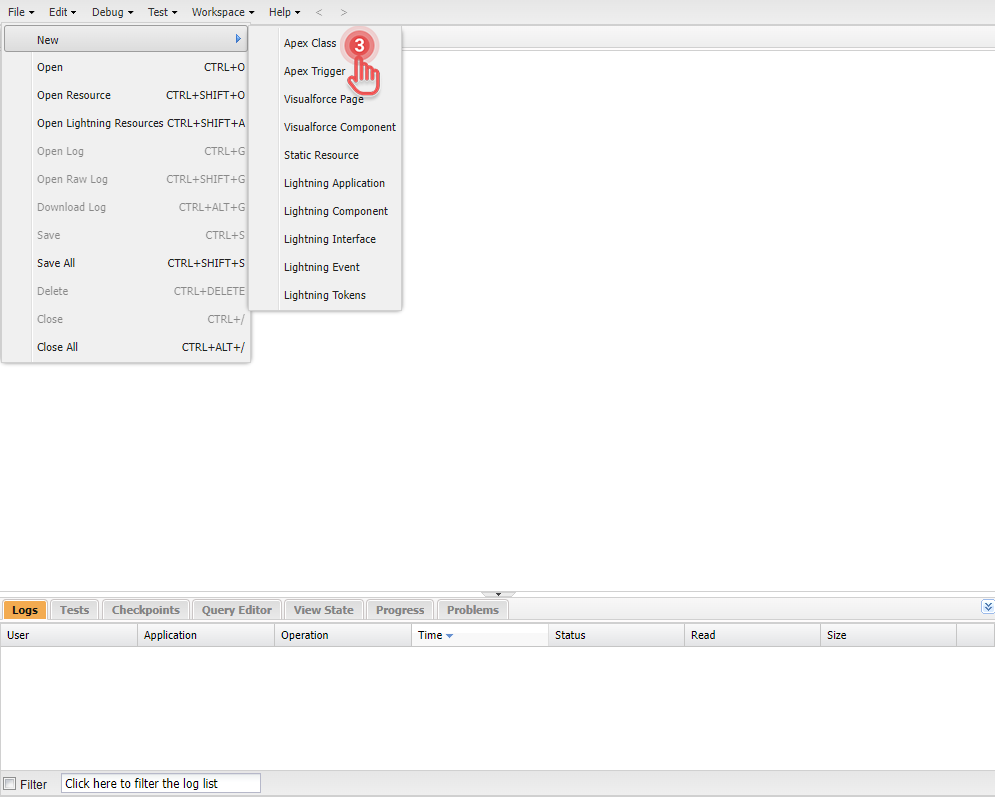
4. Give the name of the Apex class as “flowInvocableCallouts” and click [OK].
Copy this name as we will need it in the next part of this tutorial.
5. Copy and paste below code:
6. Inside “createProject” method, update the code by adding the name of the Named Credential created in the previous section of this tutorial.
7. Inside “attachDocument” method, update the code by adding the name of the Named Credential created in the previous section of this tutorial.
8. Inside “uploadDocument” method, update the code by adding the name of the Named Credential created in the previous section of this tutorial.
9. Click [File] > [Save] .

10. You may now close the Developer Console window.
Building a Flow
Now that you have the prerequisites ready, let’s build a Flow that can create a new Leap Project.
Create a new Flow
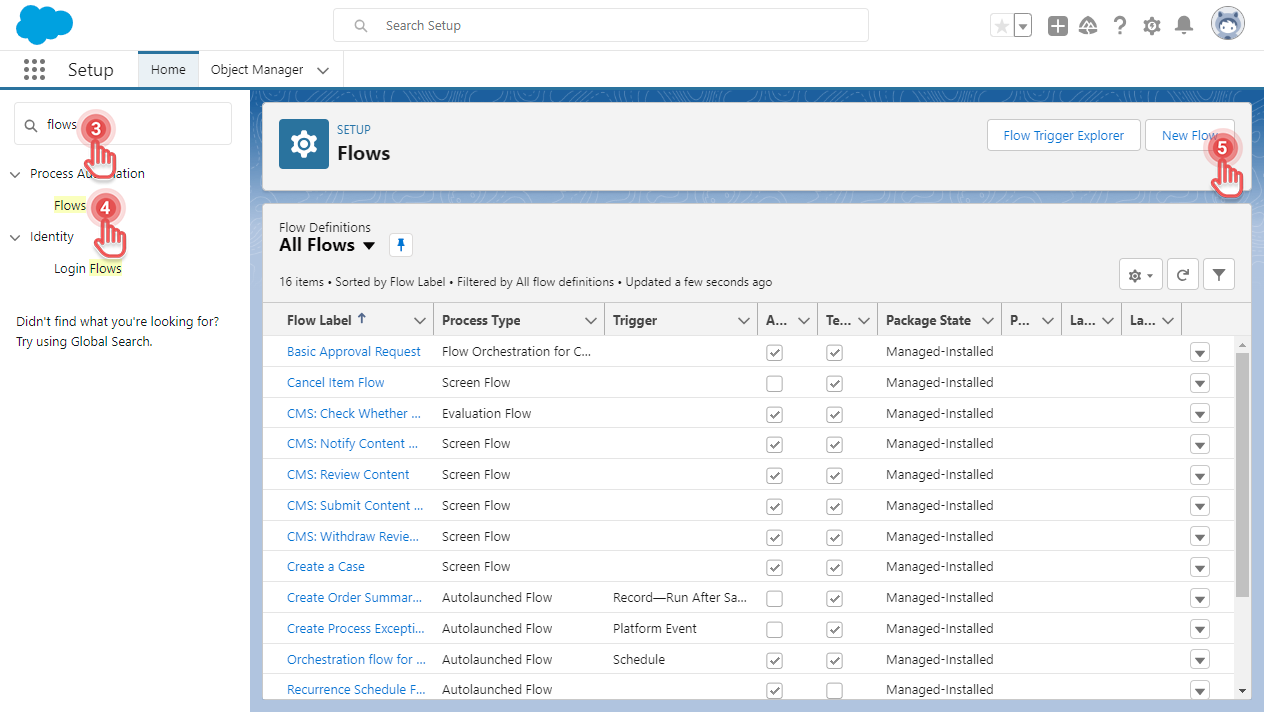
1. Click [⚙] button on the top right corner.
2. Click [Setup] option.
3. In Setup page, search for “flows”.
4. Under the Process Automation, click the Flows entry.
5. In Flows, click [New Flow] button.
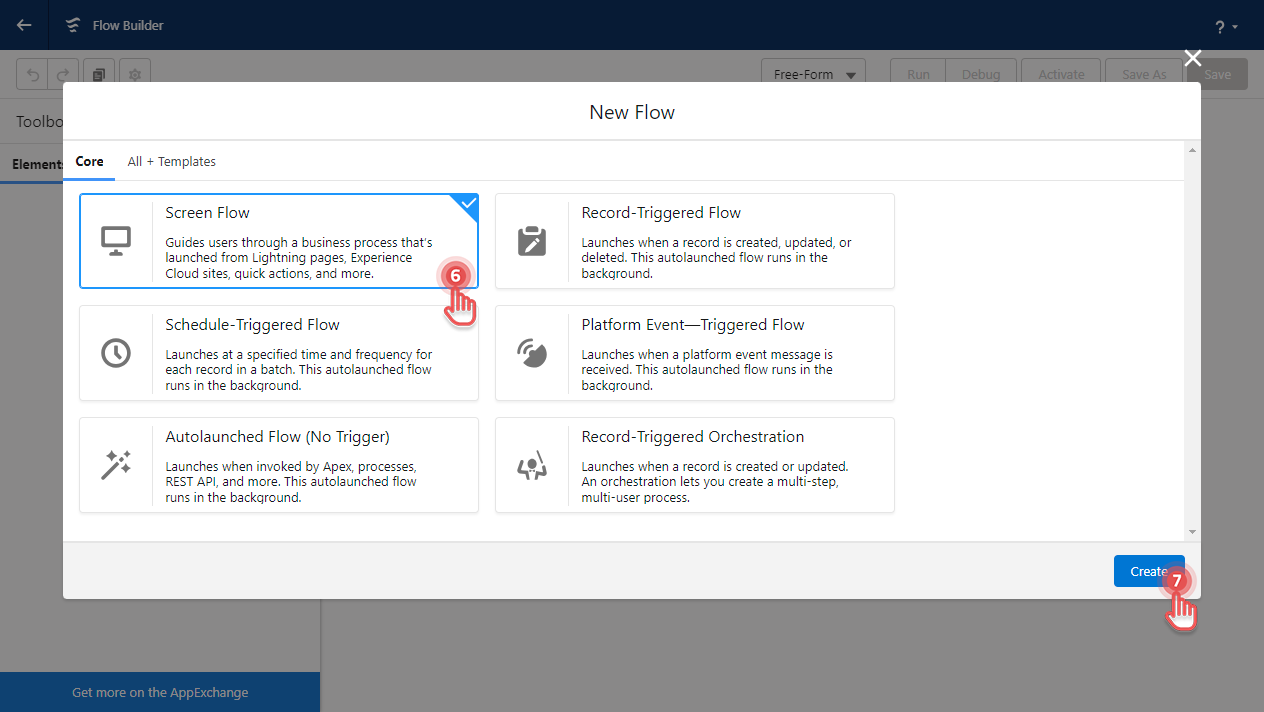
6. Click [Screen Flow].
7. Click [Create] button.
Build a Screen to accept required information
1. Click [⊕] button to add a new Element.
2. Click [Screen] option. New Screen dialog will appear.
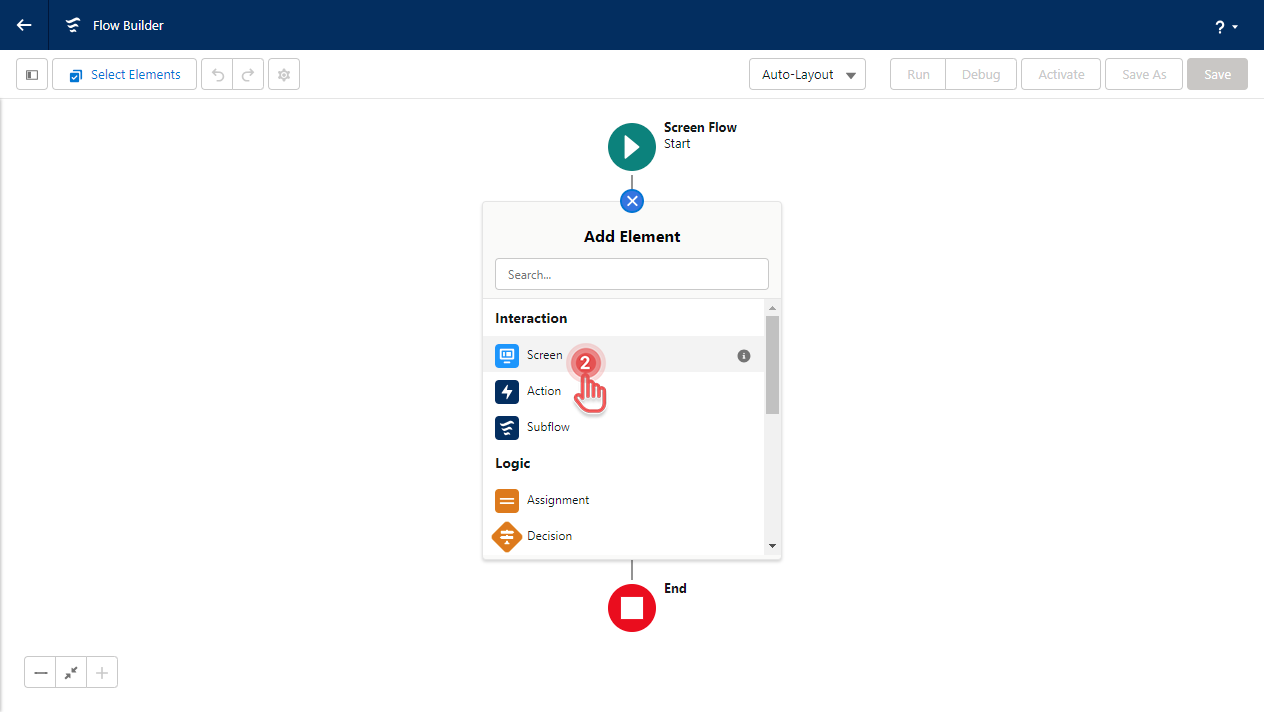
3. Under Screen Properties, give Label and API Name as needed.
4. From Components panel on the left, drag four “Text” components
and configure them as follow:
Labels | API Names | Explanations |
|---|---|---|
Document ID | Document_ID | This will be the ID of the document you want to use in your Leap Project. |
Record ID | Record_ID | This will be the ID of the record to which the Leap Project would be tied to. For example, the ID of an Opportunity record. |
Project Name | Project_Name | This will be the name of your Leap Project. |
Workflow Template ID | Workflow_Template_ID | This will be the ID of Leap Workflow Template to be used when creating your Leap Project. |
5. You may hide the [Pause] and [Previous] buttons from the Configure Footer section.
6. Click [Done] button.

Add an Action that runs the Apex class
1. Below the Screen element, click [⊕] button.
2. Click [Action] option. New Action dialog will appear.
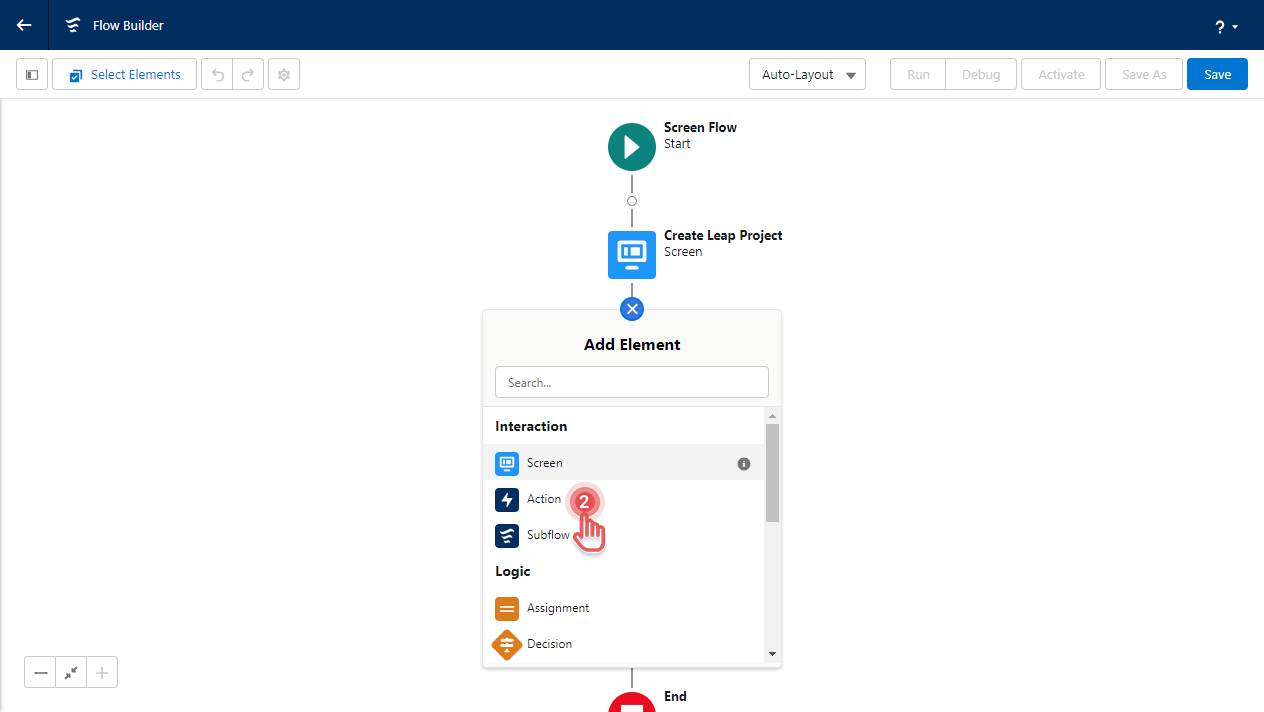
3. Under Action text field, search the name of the Apex Class, “flowInvocableCallouts”.
4. Click the “flowInvocableCallouts” entry.
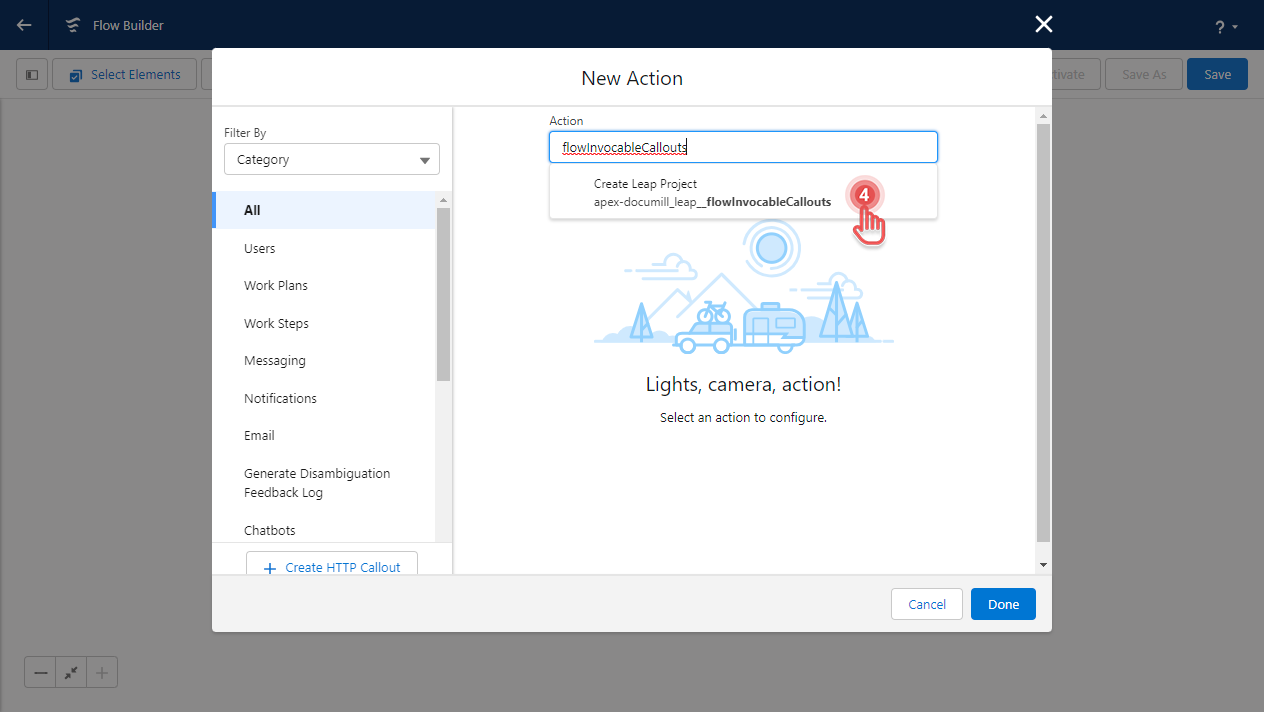
5. Add Label and API Name as needed.
6. Under Set Input Values section, enable all four of the input values.
7. For each Input Values, configure them as follow:
Input Values | Resources |
|---|---|
contentDocumentID | {!Document_ID} |
projectName | {!Project_Name} |
recordId | {!Record_ID} |
templateId | {!Workflow_Template_ID} |
8. Click [Done] button.

Save the Flow
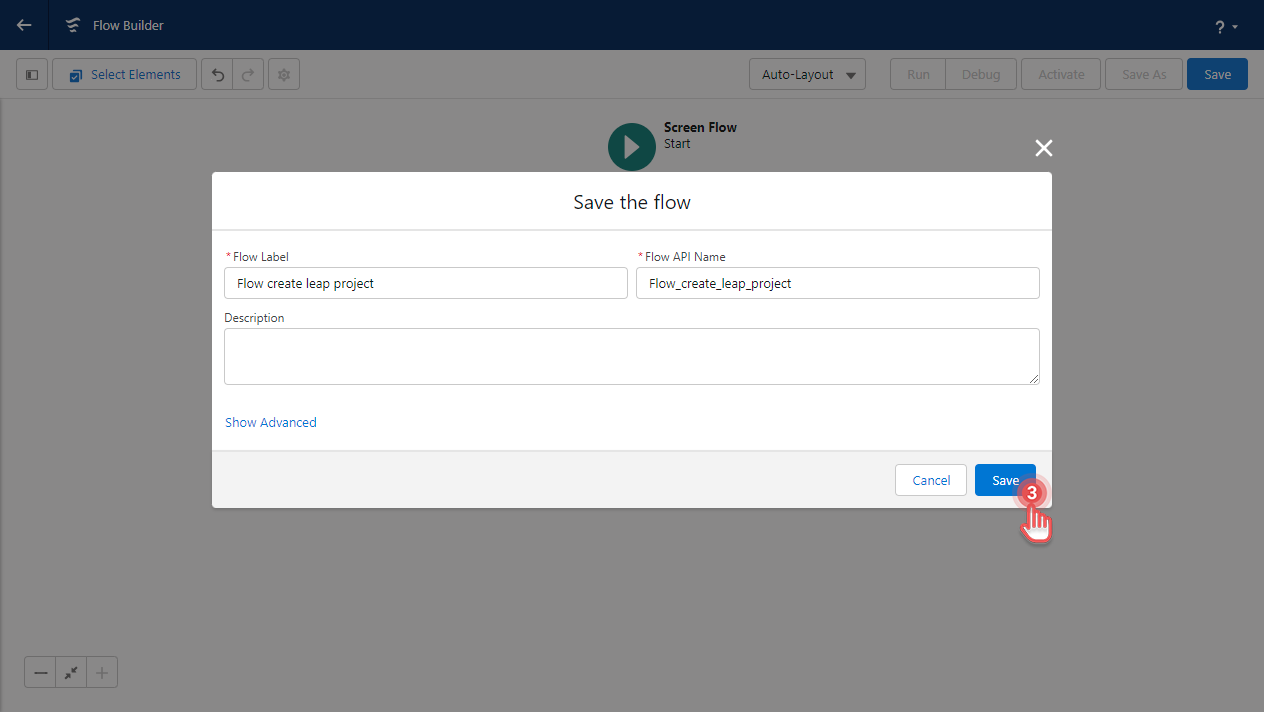
1. Click [Save] button.

2. Add Flow Label and Flow API Name as needed.
3. Click [Save] button.
Great! You have just created a Salesforce Flow that accepts required information from user and a create Leap Project from it.
Test the Flow
Because the Flow we have just created is a basic one, we need to manually collect the four information required to create a new Leap Project:
Labels | Explanations | Where to get the information |
|---|---|---|
Document ID | This will be the ID of the document you want to use in your Leap Project. | In Salesforce, open the “File Details” of the file. Check the ID from in the URL. |
Record ID | This will be the ID of the record to which the Leap Project would be tied to. For example, the ID of an Opportunity record. | In Salesforce, open a record to which the Leap Project will be tied to. Check the ID from in the URL. |
Project Name | This will be the name of your Leap Project. | You can create the name as you wish. |
Workflow Template ID | This will be the ID of Leap Workflow Template to be used when creating your Leap Project. | In Leap, open a Workflow Template that you want to use. Check the ID from in the URL. |
Once you have the information ready, you can test running the Flow:
1. Click [Run] button. A new tab that shows the Flow screen will appear.
2. Fill in the required four fields.
3. Click [Finish] button.
If everything works well, you should now be able to see the new Leap Project under the Documill Leap Projects component inside the record you chose.
Ideas to explore
The Screen input could be expanded with search functionalities to retrieve the required information.
Instead of Screen, the flow can be triggered automatically by other kinds of trigger.
The provided Apex Class contains examples of utilizing Leap External APIs.
It can be used as a reference to come up with a custom Apex Class that better matches your needs.
If you have other ideas, we would be glad if you could share them with us by sending an e-mail to: support@documill.com .