How to create a DocuSign developer sandbox account
DocuSign has a full demo environment that mirrors the live production system and allows testing and integrating the APIs. To do so, create a developer sandbox (they are free) and create an Integrator Key through the Admin menu of sandbox - the only place the keys can be created - then promote that key to your live DocuSign account.
-
To create a Developer sandbox account, use this link: https://go.docusign.com/sandbox/productshot/
-
After filling in your details and entering ‘GET STARTED’, an account activation email will be sent to the email you have provided in the form.
-
Click the 'Activate' button to finish your account activation and fill in details about your password and security question on the ‘Activate your account’ page.
To log in to the sandbox, use the link: https://account-d.docusign.com/#/web/login
How to create DocuSign Integrator keys
An Integrator Key is a Unique Identifier for each DocuSign integration. It is used (and required) for all API calls (SOAP or REST) to any DocuSign service. Having an Integrator Key lets DocuSign “tag” each API call from all integrations, and helps provide both an additional layer of security and helps DocuSign support its partners. An Integrator Key is REQUIRED for all integrations, and if you want to move to Production (make calls to http://www.docusign.net) you must be certified and get that Integrator Key authorized by DocuSign for Production.
Steps to get the DocuSign Integrator Key:
-
After logging in to your developer sandbox, click on the profile icon in the top right corner of the screen > Click on ‘Go to Admin’. This will open the admin dashboard.
-
On the left pane, under the ‘Integrations’ section, click ‘API and Keys’. Your account’s API and key integrator information will be displayed.
-
To generate an integrator key, click ‘Add App/Integrator Key’. A pop-up form will be displayed, prompting you to enter ‘App Description’, any text describing the Dynamo application will do here, such as “Dynamo doc gen”… Click ‘Add’ and go back to the dashboard view.
Your API and Integrator Key Information view will look similar to the screenshot below:

From this developer account, you will need API Username, your developer account’s password and Integrator Key to use in the Dynamo template later.
Creating a Dynamo eSignature custom object in Salesforce to display status updates
The status of DocuSign documents being signed can be shown in Salesforce through ‘DocuSign Connect’. To enable the call back functionality, a custom object is needed. The “Dynamo_ESignature__c” custom object is used to keep track of the DocuSign document status.
A Custom object “Dynamo_ESignature__c” should be created in Salesforce, and it should include the following fields:
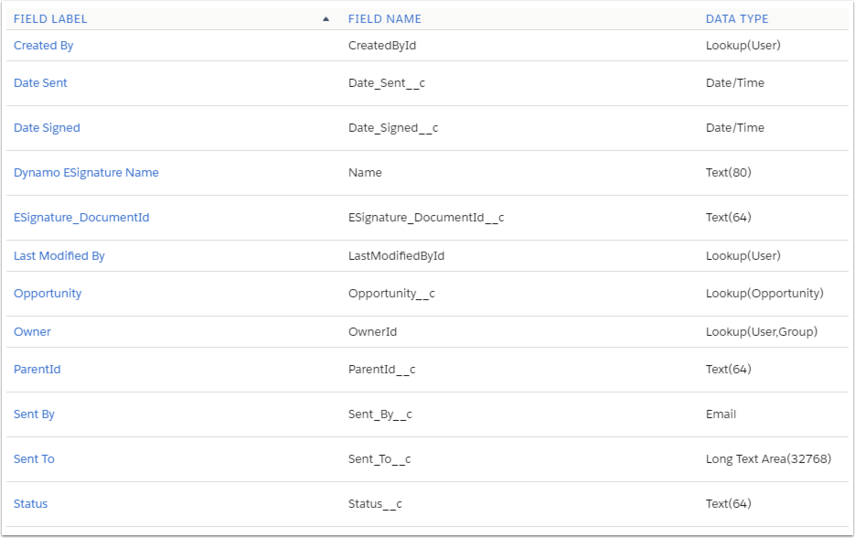
The lookup field “Opportunity__c” is optional and is used to relate “Dynamo_ESignature__c” records to parent records. So, if you want to see the send status in context of some object view like Opportunity, add a lookup field with that type. Name can be anything, and it’s defined to Dynamo through “StoreESignature” command’s attribute “parentIdFieldName”.
Setting DocuSign Connect Configurations to get status updates
DocuSign Account webhooks (Connect Configurations) can notify Dynamo anytime an envelope in the configured account has a status change. Account webhook configurations are referred to as “Connect Configurations.”
Steps to set DocuSign Connect Configurations:
-
Go to admin dashboard (click on the profile icon in the top right corner of the screen > Click on ‘Go to Admin’)
-
On the right pane, scroll down to the ‘Integrations’ section, click on ‘Connect’
-
Add a new custom configuration: click on ‘Add Configuration’ button > Custom
-
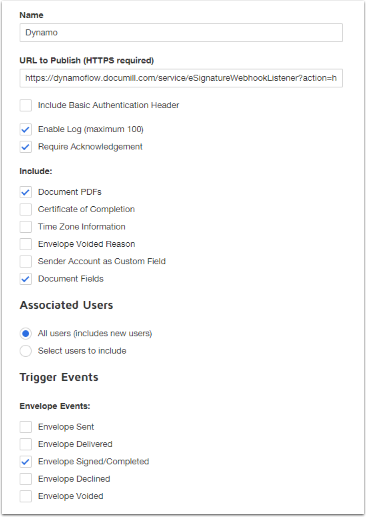
The Custom Configuration Settings should include the following values: (screenshot below)
-
Name: you can enter anything in this field. The name of the connection should be explicit enough in case there are more connections added in the future. In the below example, ‘Dynamo’ was used.
-
URL to Publish:
https://dynamo-eu1.documill.com/service/eSignatureWebhookListener?action=handleDocuSignRequest
-
The following boxes should be checked:
-
Enable Log (maximum 100)
-
Require Acknowledgement
Include:
-
Document PDFs
-
Document Fields
Associated Users
-
All users (includes new users)
Trigger Events
-
Envelope Signed/Completed