The Flow is the template part in which the template's logic resides, but it's also the topmost structure of the logic that defines the paths of the evaluation process. Although many Dynamo templates follow a certain model structure with their Flows, logic creators are allowed to shape the Flow however they like.
Structure
The Flow itself doesn't directly contain the commands. The commands are placed into Steps, which are smaller containers within the Flow that link to each other, forming one or more possible sequences. In the Template builder, the Flow is depicted in this manner:
Each of the boxes displayed there with arrows pointing in and out of them is one of the Steps. The arrows show how the sequence of Steps progresses. The inside of a Step can look like this:

Within is the place for commands, each command having its own line. A single command generally performs a single task, and so the logic is formed by having a series of commands working together. They get to do their job one by one in the order they're placed in, starting with the topmost one and heading downwards. As commands are able to make use of the variables created by previously evaluated commands, placing them in the proper order can be important - as an example, in the image above the first record command refers to the "id" variable created by the first set command. In the editor, you can drag the commands around to change their order easily.
While the sequence of commands within a Step is basically a straight line from top to bottom, it does have a few special characteristics, such as conditional sections. These characteristics are described in their own article - see Command sequence. The article Variables and attributes is also very relevant to how commands work.
Among the Steps there can be, and often are, Screen steps. They differ from normal Steps in that they do not contain a command sequence - instead they contain a Screen, which is an HTML page displayed to the user running the evaluation process. The Screen HTML can contain logic attributes and elements which are evaluated when the Screen is to be displayed. The Screen steps' role is generally to collect input from the user, as the values of input elements present in the Screen HTML become variables for the commands in normal Steps to use.
Between the Flow and the Steps is another structural layer: Segments. Segments divide the Flow into phases of its life cycle, e.g. one for the Flow's start, one for its main work, and one for any finishing operations. They also form a sequence in which the Flow goes through them. This particular sequence of Segments can be seen here in the upper left corner as "Before", "Main" and "After", occurring in that order from left to right. Clicking any of them in the editor changes the set of Steps displayed below to that of the clicked Segment's.
Progress
With all the structural layers in place, the progress of the Flow's evaluation process from start to end is as follows. On the Segment level, the evaluation proceeds from Segment to another in a strict, absolute order, with the Flow itself finishing when the last Segment ends. Within each Segment the evaluation proceeds from Step to another in either a fixed or variable order, with the Segment finishing once a Step finishes without declaring a follower. Within each Step the commands are evaluated in a relatively straight sequence, with the Step finishing when its command sequence ends.
From Step to Step
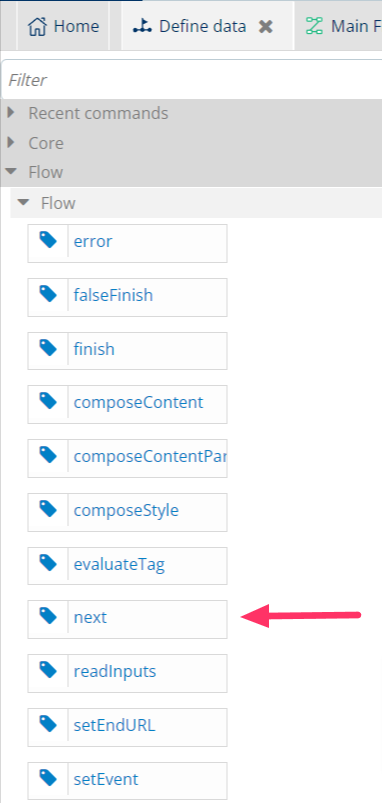
Of all these structural layers through which the evaluation process goes through, the most fluid paths are found among the Steps. Steps can connect to multiple other Steps, they can skip, or even repeated. This route through the Steps is mainly defined by the control command next placed within the Steps themselves. This essential command can be found belonging in the "Flow" group in the Step editor's left-hand panel.
In the Template editor's Segment view, the arrows connected to the Steps represent the effects of the next commands. An arrow pointing out of the Step indicates that the Step contains a next command, pointing the path towards the Step named above the arrow. In the image below, the Step "Compose - Start" is followed by Step "Compose - End".

If you then take a look at the commands within "Compose - Start", the corresponding next command (which the editor displays as "Go to") can found at the end of the sequence. Changing or deleting the command here would also change or remove the arrow in the higher-level view.
The only attribute of the next command is step, which defines the Step the evaluation process will head to by the Step's ID. Any Step within this Step's own Segment can be defined - even the Step itself (but be careful to not create an infinite loop - that will lead the evaluation process into an erroneous end).
Multiple routes
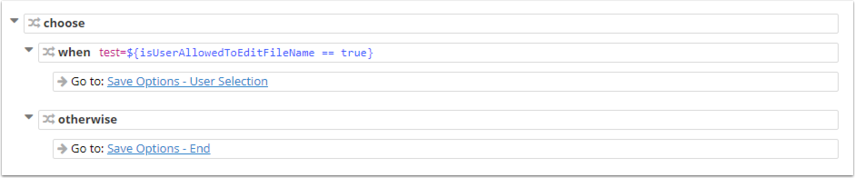
A Step may contain more than one next command, allowing the evaluation process to proceed into more than one possible direction. As the evaluation process cannot split into multiple directions at once, this requires the use of conditions that define which of the various next commands takes effect. As might be expected, with multiple next commands present, the Template editor displays multiple arrows pointing out of the Step.

The command sequence of the Step then contains the corresponding commands nested within a conditional structure.
Routes out of Screen steps
Screen steps, not containing any commands and therefore unable to have the next command, define their following Step in a somewhat different manner. Their equivalent of the next command is a logic attribute of the same name - next. This logic attribute can be placed into any submit button on the Screen and, like the command, it specifies the ID of the Step the evaluation process should head to. To have multiple routes out of a Screen step, there can simply be multiple buttons with the next logic attributes pointing to different Steps.
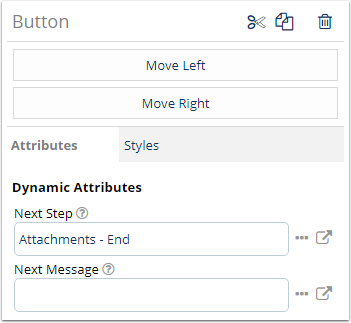
In the Template editor, head to a Screen step and click any button on the Screen to see the possible logic attributes for it. The one displayed as "Next Step" is the logic attribute talked about here. Additionally, there's "Next Message" - this defines a message that will be displayed while the next Step is being loaded.
The last Step
If the command sequence of a Step doesn't contain any next, or none of the next commands there are evaluated due to conditions surrounding them not succeeding, the end of the command sequence will also finish the Segment. The equivalent of this in a Screen step is clicking a submit button that does not have the logic attribute next defined.
The first Step
While the routes between Steps are defined through the command and logic attribute next, the first Step of a Segment's evaluation has to be defined in a different manner. This uses a value provided to the Flow evaluation process at the time of its creation called "Event". Any Step may be set as the starting Step corresponding to a specific Event, and one Step may be set as the default starting Step, which will be the first Step if the Event value doesn't lead to any other Step becoming the first.
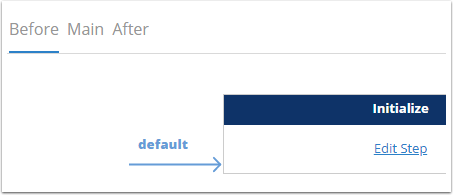
In the Template editor, the Event-defined first Steps are defined by blue arrows pointing towards the Steps. The Event value leading to the Step is displayed above the arrow.

In the case of the Steps above, Event "rerun" would cause "Check history" becoming the first Step, while "firstRun" makes "Prepare first run" the first Step. If the Event value is anything else, "Prepare first run" will be the first Step, since it is set as the default starting step as indicated by the arrow "default" pointing to the Step. As shown here, multiple Events may also lead to the same Step.
If a Segment doesn't specify a starting Step for the evaluation process' Event value and the Segment doesn't have a default starting Step, no starting Step can be defined, and the evaluation process will skip the Segment.
Error-handling routes
Any Step may contain an error-handling route that immediately directs the evaluation process into another Step should a command in the current Step produce an error. This can be useful if a Step has a command or another that can be expected to fail in some cases, while also having effects critical to the operation of following commands. The Step at the end of the error-handling route could be a Screen informing the user of the error, or it can lead the Flow into a different path that skips Steps with commands that would now also fail due to the original error.
In the Template editor, these error-handling routes appear as red arrows pointing out of the Steps. Similarly, a Step that is the error-handler of another Step has a red arrow pointing into it. Below you can see the Step "Initialize" having an error-handling route defined. If all the commands within the Step are evaluated without problems, the evaluation process goes into "Define Formats", but if an error occurs, the evaluation process will go into "Initialization Error" instead.

Non-interactive use
If a Flow is evaluated in an environment in which user input is not possible, such as through the Dynamo API, any Screen steps will automatically be skipped. Skipping a Screen step has the following effects on the evaluation process:
-
The current Segment will end. This is caused by the fact that Screen steps define their follower Step through a button press, which is not happening in a non-interactive environment.
-
None of the variables corresponding to inputs on the Screen will be created. Any references to these missing variables will generate errors.