Implementation
Dynamo Clause is implemented as a Salesforce custom object named "Documill Dynamo Clause" (API name: dynamo__Clause__c). This object comes with the Dynamo AppExchange installation package.
The Clause object has a number of pre-defined fields such as: Name, Title, Language, Category, Subcategory and Clause Text. Additional custom fields can be added from the Object Manager in the Salesforce setup. From the Object Manager, search for Dynamo Clause (dynamo__Clause__c), navigate to Fields & Relationships and click on the “New” button to add a new custom field.
The Category and Subcategory fields allow assigning attributes to Clauses to enable filtering. This is highly recommended to make maintaining and using the clause library easier. The Category pick-list has three sample value options: Legal, Sales and Other. These can be edited, and more values can be added from the Object Manager in the Salesforce setup: search for the Dynamo Clause (dynamo__Clause__c) object, select Fields & Relationships. From there, you can edit the Category pick-list and add more options of your choosing.
When implementing Clauses, consider who should have access to view and edit the clauses. See this section for more information on Clause permissions.
Adding a new Clause
Clauses can be added by creating a new Clause record through the Dynamo Clauses component. The component can be either searched via the Salesforce App Launcher or accessed via the Documill Dynamo Lightning component. From the Dynamo Clauses component, a new clause can be added by clicking on the “New” button.
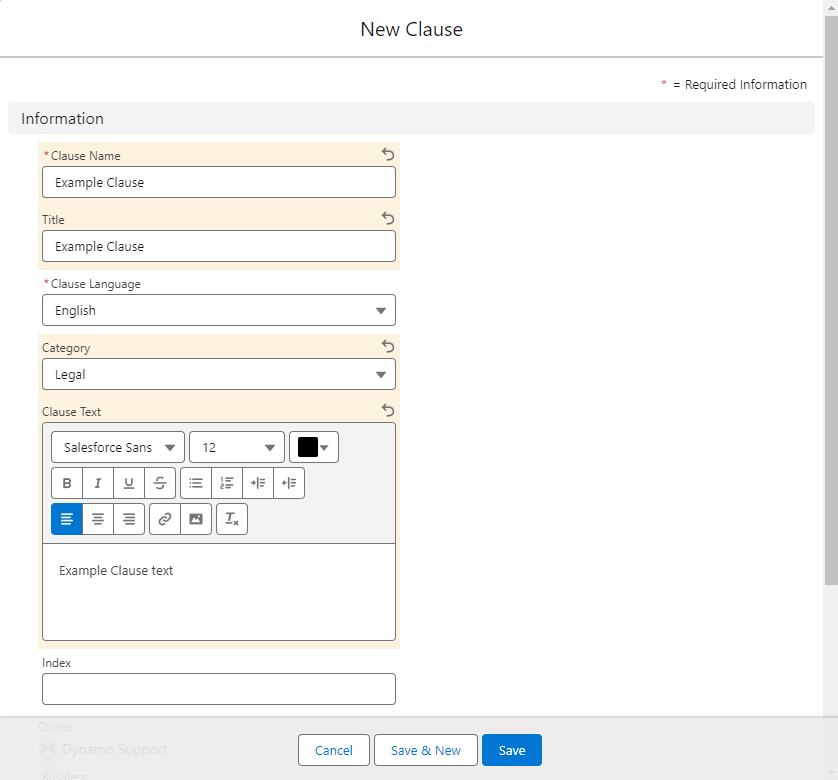
Name serves as a unique identifier for the clause, and Title is the informal title. The Name field allows detecting multiple versions of the same clause; if you want to create two versions of the same clause, giving them the same name allows grouping them as versions of the same clause, and the title field can be used to differentiate the clauses.
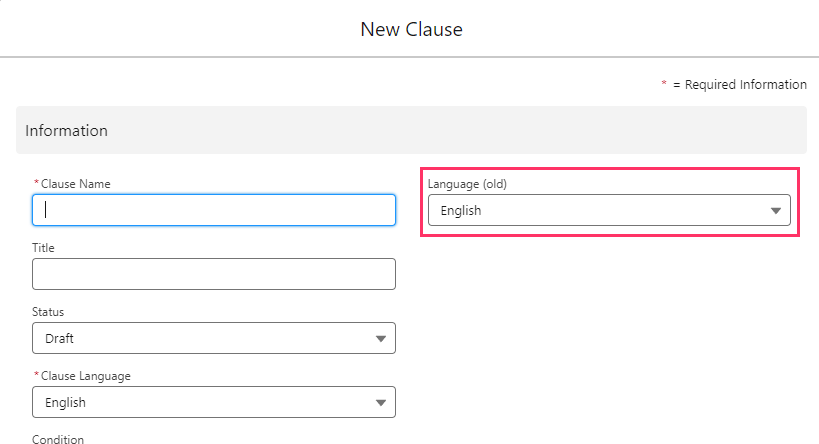
Language describes the used language. If a Clause has several language versions (different language field), the name is the same for all versions. It is recommended to use ISO 639-1 language codes such as en (English), de (German), fi (Finnish).
When using clauses in a Standard template created before February 2024, remember to use the Language (old) field instead when creating a clause.
The Language field should be always be filled in, even if just one language is used. If you have the same Clause content but in different languages, you can add another language version to the existing clause - just create a new clause and use the exact same name as the original clause. The system will recognize these are different versions of the same clause. You can use the Title field to differentiate each clause.
Clause Text contains the actual Clause content, and it can include formatted text and images.
Clause Styling
When creating a clause in Salesforce, basic formatting such as text color, bullet points and text decoration can be defined.
When styling your clause, it is important to consider that the template where the clause will eventually be inserted also has styling. Note that, as a principle, Clause styling overrides template styling. This means that any styling applied within the clause editor will be reflected in the final document. For instance, if a line of text is set to bold, it will appear as bold in the final document, irrespective of other styles applied within the template.
If you want the style of your template to be applied to the clause being inserted: Do not use any styling when creating a clause in Salesforce. If pasting the text from another source, make sure to paste it as plain text.
If you want the style of the clause to retain the style set in Salesforce: Set the style for the whole clause in the clause editor when creating the clause.
Dynamo Clause list
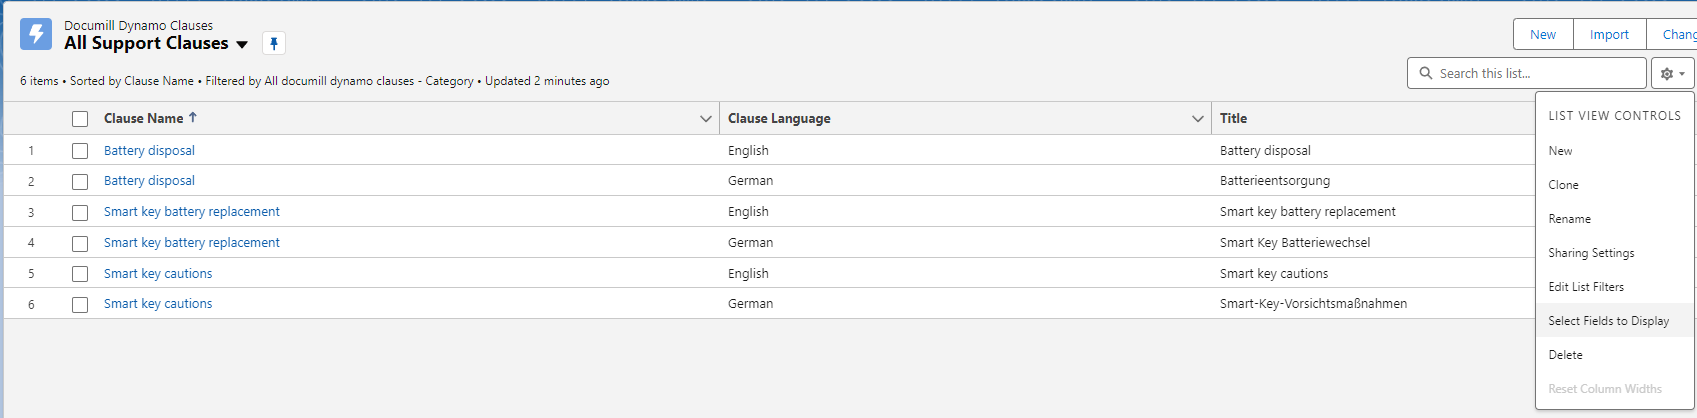
When clicking on the Documill Dynamo Clauses tab in the Dynamo app view, a list of clauses that have been created in your org is displayed. If a Clause has several language versions (the same clause content but in different languages), all versions of the same clause are displayed in the list.

The example Clause list above uses a custom list view. It is recommended to create a similar list view that displays all the relevant clause information such as Language and Title. This makes maintaining the Clauses easier.
To display additional fields: Go to List View Controls > Select Fields to Display > Add fields from 'Available Fields' to 'Visible Fields' list.
Dynamic content in Clauses
Clauses can have placeholders for Salesforce field values, just like templates (“merge fields”). For example, you could have a Clause containing a standard greeting and want to include the user’s name in it:
“Best regards,
${User.Name}. “
Clause text can also contain variables such as the system time variable, which always updates to the current time when generating a document.
Including both variables and Salesforce field values in Clauses is done using EL notation. All variables must be declared in the template's logic (usually the 'Initialize' step in the 'Before' section in the mainflow) where clauses will be used.
Configuring Clauses in a Template
Once you have created Clauses with the above instructions, you are ready to set up your Templates to leverage those Clauses. This can happen in two ways, depending on whether you want users to populate clauses manually or whether you want them to populate automatically based on logic (this section explains when to use each).
-
If you want the user to be able to populate a Clause manually, two things need to be configured in the template builder:
1. In the Settings, under the Workflow section, enable Editing.
2. Insert an editable group where the users will be able to add Clauses.
Once both items are set up, the end user will have access to the clause pane while editing the document.
Clauses can only be added to editable groups. Once a clause is added, it can still be edited by the user.
-
If you want a clause to populate automatically based on logic, you need to start by adding the relevant clauses to the document and proceed to use the “if” element command to determine the conditions upon which the clause is to be displayed or hidden. Using the “if” element command on a clause, allows you to display different clauses based on Salesforce data or pre-defined conditions.