How to Configure Signing Settings
By configuring these settings, users can tailor the e-signing process to their specific requirements, ensuring a smooth and efficient experience for all parties involved.

Can forward signing rights
Allows the signer to forward their signing rights to another person. If off, the destined person will have to sign the shared document.
Require scribble
Allows the signer to scribble (draw) their signature besides typing or uploading a signature image.
End URL
The URL to which the signer is redirected to after exiting the share process. For example, after viewing the document or signing. If not entered, the user will be directed to Documill website.
Valid days
The number of days the document remains valid. By default, the document is expired after 30 days after sharing.
Owner
To define the owner of the sign request. This person will later receive notifications through email if the document has been rejected or signed. If not defined, the current user will be the owner of the sign request.
Responsive view
When responsive view is enabled, the recipient of the shared document will view the shared document in the HTML format instead of PDF. Responsive view is ideal when sharing the document to mobile users as it offers more robust compatibility. Enabling responsive view also grants access to the Allow Input setting.
Allow Input/data collection
When Allow Input is enabled, the recipients of the shared documents are able to input or edit the document if any are present. This is ideal for data collection from the recipient. The collected data can also be saved back to Salesforce. Read more about collecting data from external users here: Collecting Data from Users
Customize Email Contents and Subjects
Custom email notifications enable organizations to maintain brand consistency with logos, colors, and fonts, communicate in their preferred language, and offer editable sections for personalized messaging. This customization enhances engagement, reduces errors, and automates communication, minimizing manual follow-ups. These features make Documill Dynamo's email notifications versatile and adaptable across different industries and workflows.
Custom email | When it is used |
|---|---|
Sign request | To notify recipients that a document is ready for their signature, providing a direct link to review and sign. |
Reminder | To gently remind recipients to sign the document, ensuring the process stays on track. |
Completed | To inform all parties that the document has been successfully signed and the process is complete. |
Rejected | To notify document owners that the document has been rejected, with details on the next steps or required actions |
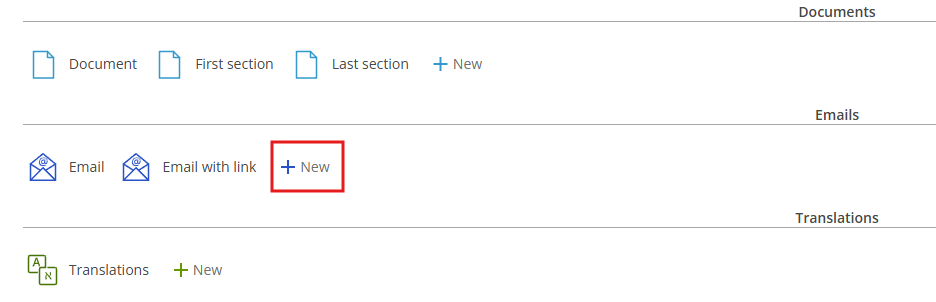
In the Template Builder, click on New in Email section to create new Email Templates
Once inside the email template editor, you can start customizing the email content. Input your own content with dynamic data, images, paragraphs, etc. same as creating Document templates. Since Email Templates also based on HTML, you can switch to HTML mode for more advanced customization.
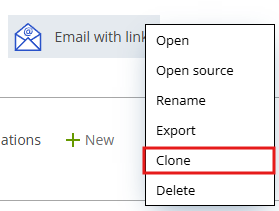
If the new template is used to share a document as a link when using an external flow, start the creation process by cloning the Email with link email template.
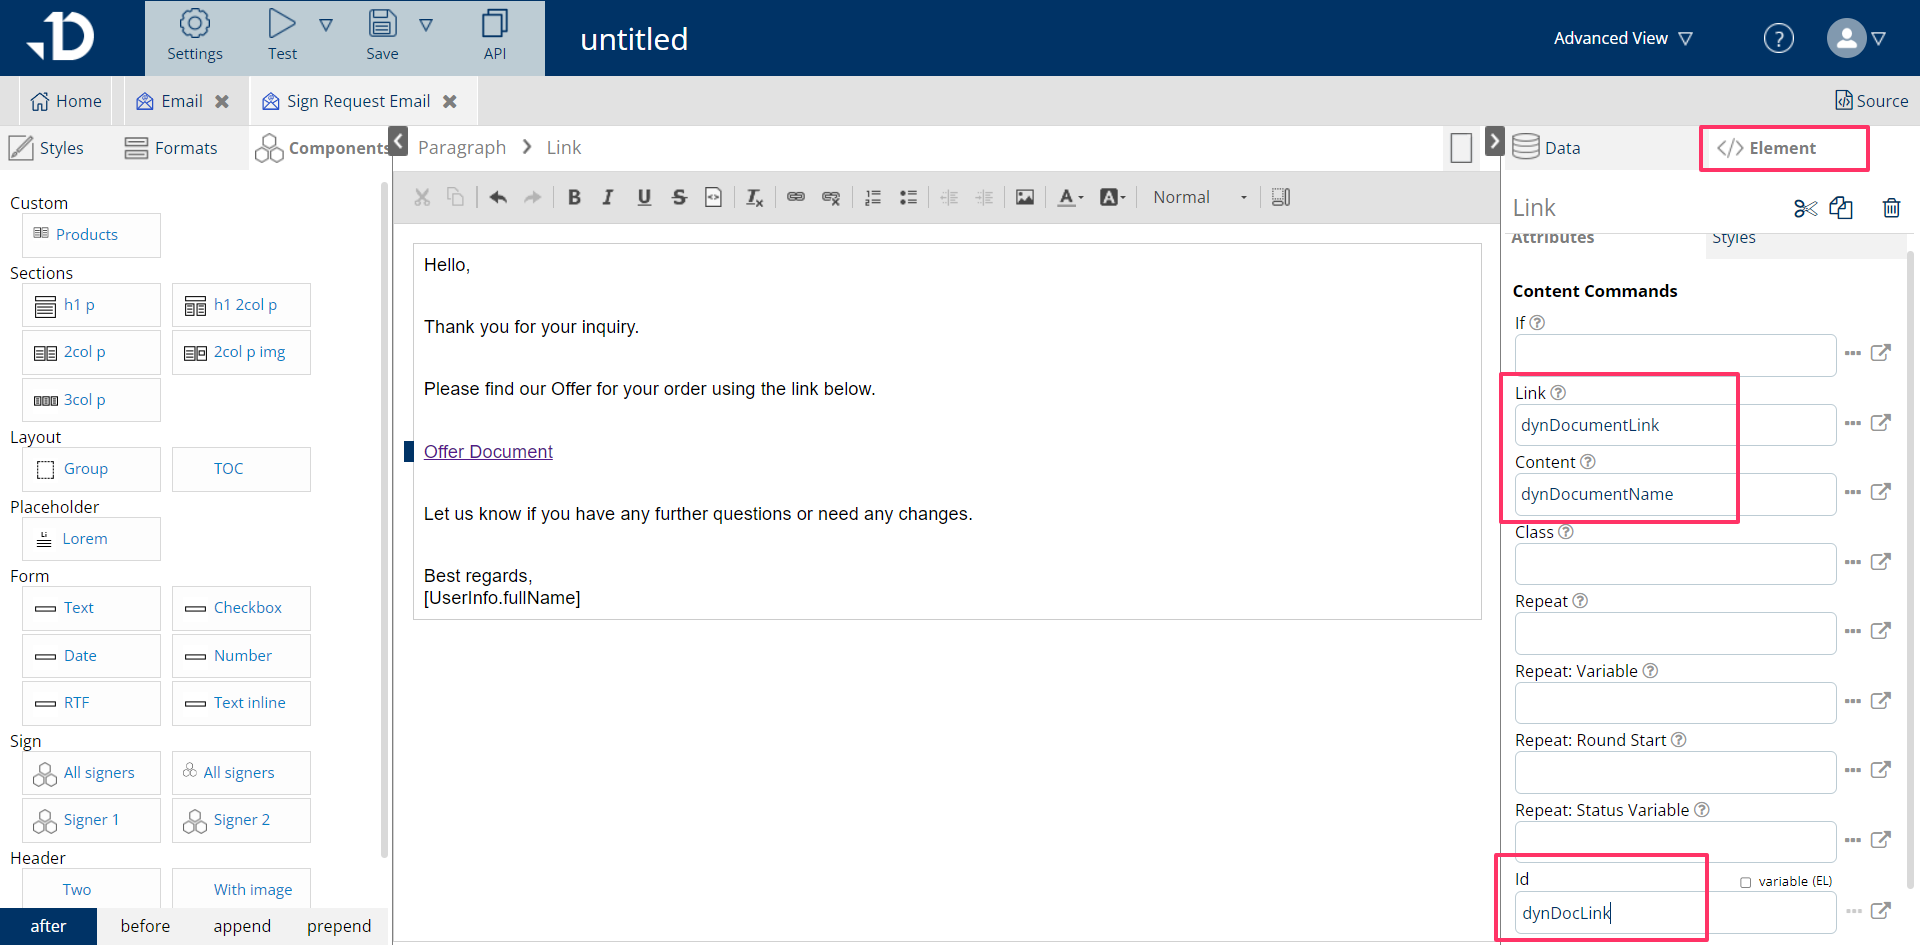
Alternatively, a document link can be added as such:
On a paragraph, click Link on editor toolbar to add a hyperlink. Input in Display Text to create a placeholder text > hit OK
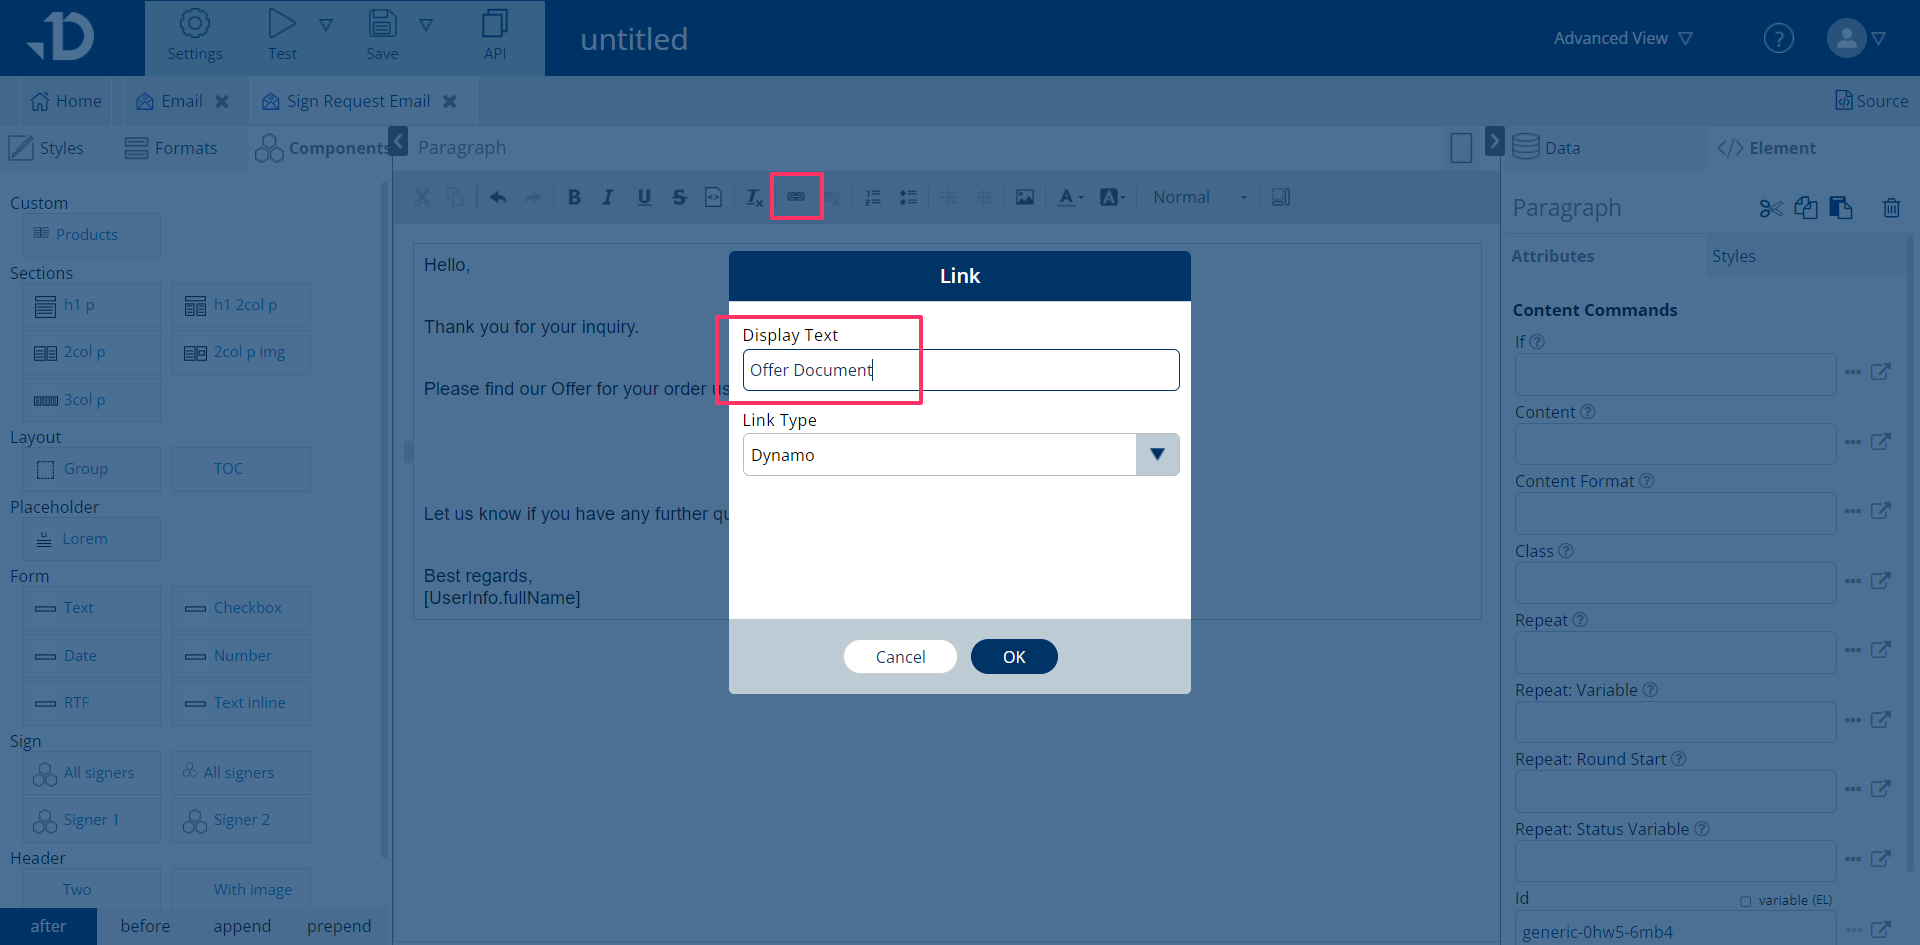
Configure the link using Element tab. Input the following values.
Link:
dynDocumentLinkContent:
dynDocumentNameId:
dynDocLink
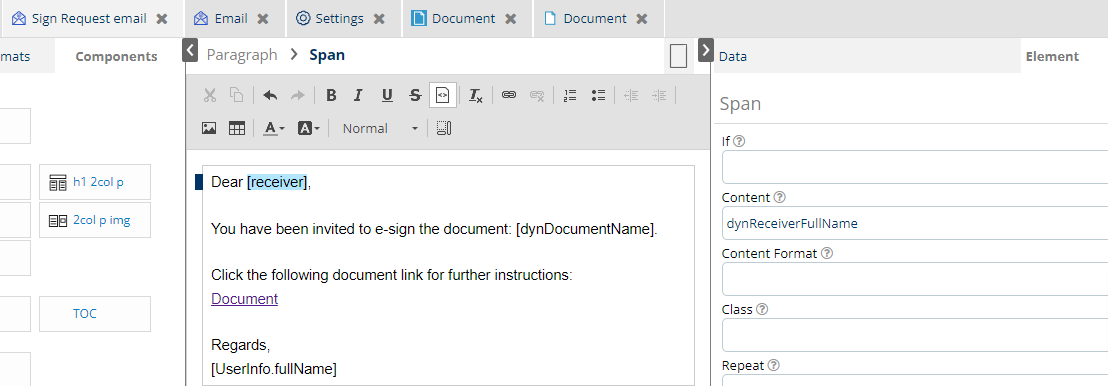
Define the signer in the template.
Receiver variable:dynReceiverFullName
Defines the template and subject for the email sent to request a signature. This email is used when the document is shared to the signer to request signing.

Template: Define the email content for sign request email. Any created custom emails will appear on the list for selecting. For example, if the option 'None' is chosen, the default sign request email will be used.
Subject: Define the subject for the sign request email. Expression language can be used to add dynamic data to the subjects. The subject must be inside single quotes. Example:

Defines the template and subject for the reminder email sent to the signer. This email will be sent when the owner of the document or the one who initially shared clicks on the Send reminder button in the Document view.
Template: Define the email content for the reminder email. Any created custom emails will appear on the list for selecting. For example, if the option 'None' is chosen, the default sign request email will be used.
Subject: Define the subject for the reminder email. Expression language can be used to add dynamic data to the subjects. The subject must be inside single quotes. Example:

Defines the template and subject for the email sent when the signing process is completed. This email will be sent both to the owner or the one who initially shared the document and the signer (to all signers) an email notification that the document has been signed. Also, the signed document is attached for download.
Template: Define the email content for the completed email. Any created custom emails will appear on the list for selecting. For example, if the option 'None' is chosen, the default sign request email will be used.
Subject: Define the subject for the completed email. Expression language can be used to add dynamic data to the subjects. The subject must be inside single quotes. Example:

Defines the template and subject for the email sent when the signing request is rejected.
Template: Define the email content for the completed email. Any created custom emails will appear on the list for selecting. For example, if the option 'None' is chosen, the default sign request email will be used.
Subject: Define the subject for the completed email. Expression language can be used to add dynamic data to the subjects. The subject must be inside single quotes. Example:

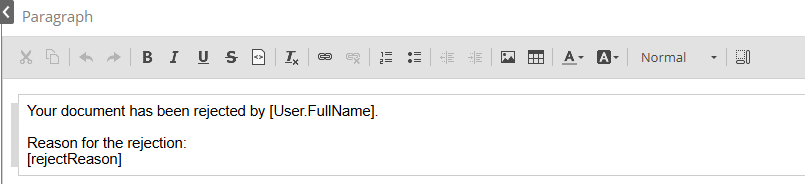
In the default rejection email, the rejection reason provided by the signer is also included, this is not the case for custom rejection emails. If the reason needs to be included in a custom rejection email, it can be done as such:
Create a custom rejection email with a placeholder for the rejection reason ([rejectReason]).
Highlight the placeholder and create a span by clicking on the span icon.
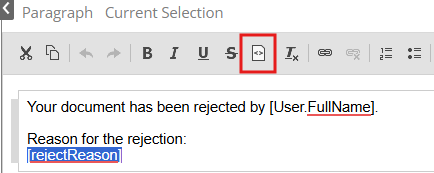
On the right-hand side of the screen, select Element.
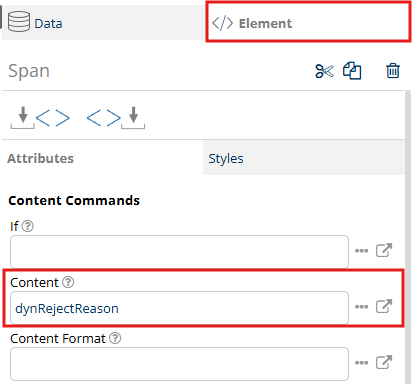
Add dynRejectReason as the content of the newly created span.
The created placeholder will display the rejection reason which the recipient is required to enter if they decide to reject a document.
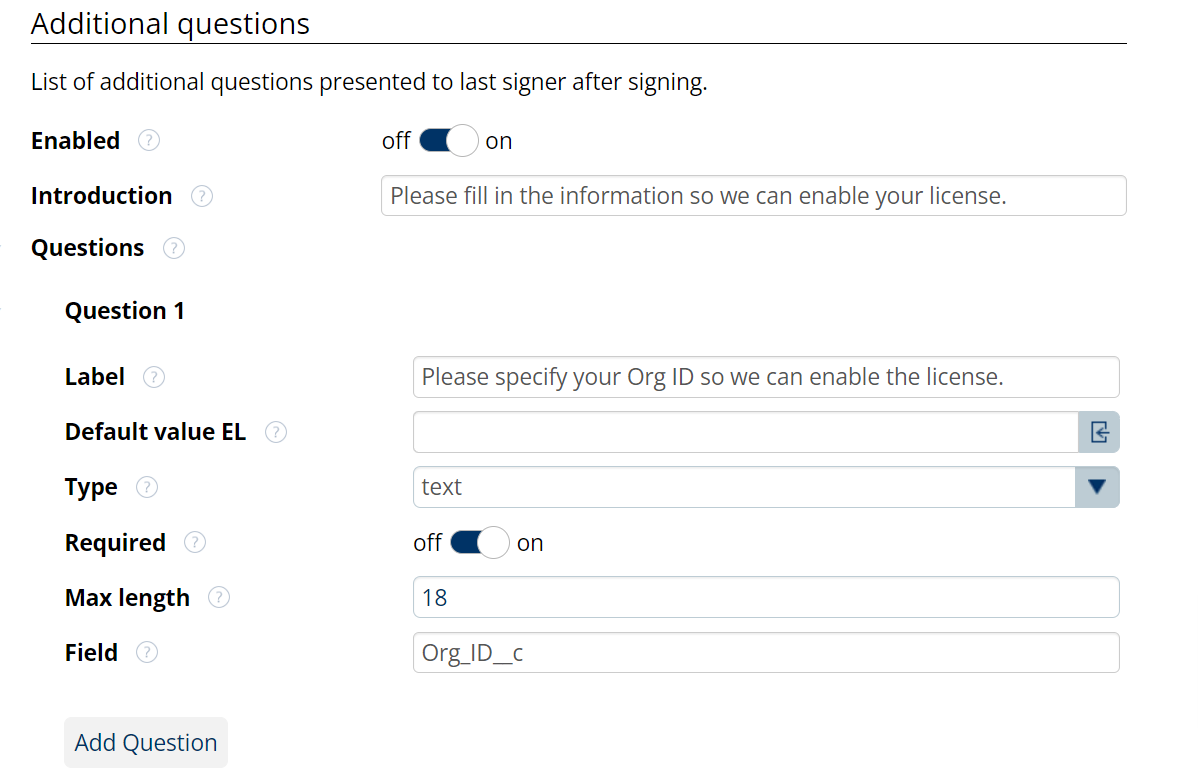
Additional Questions
List of additional questions presented to the signer after they complete the signing.
Enabled: To enable or disable the additional questions feature.
Introduction: An introductory text or message displayed before the questions.
Questions: More questions can be added when click on ‘Add Question’
Label: content of the question to be presented to the signer.
Default value EL
Type: define the type of the answer input field. For example, if ‘number’ is chosen, the user cannot type any alphabet characters.
Required: define if answer is required for this question or not
Max length: define max length of the answer.
Field: Salesforce field to record the answer when it is submitted.
For example,