Preparing In-document Signature Placement
Available to Manager and Administrator.
To have signatures placed in the document content, some preparations are needed during project planning. To allow quicker project planning, you can do the preparations already in the Workflow Template.
Enabling In-document Signature Placement
First, enable In-document Signature Placement in the Workflow Template.
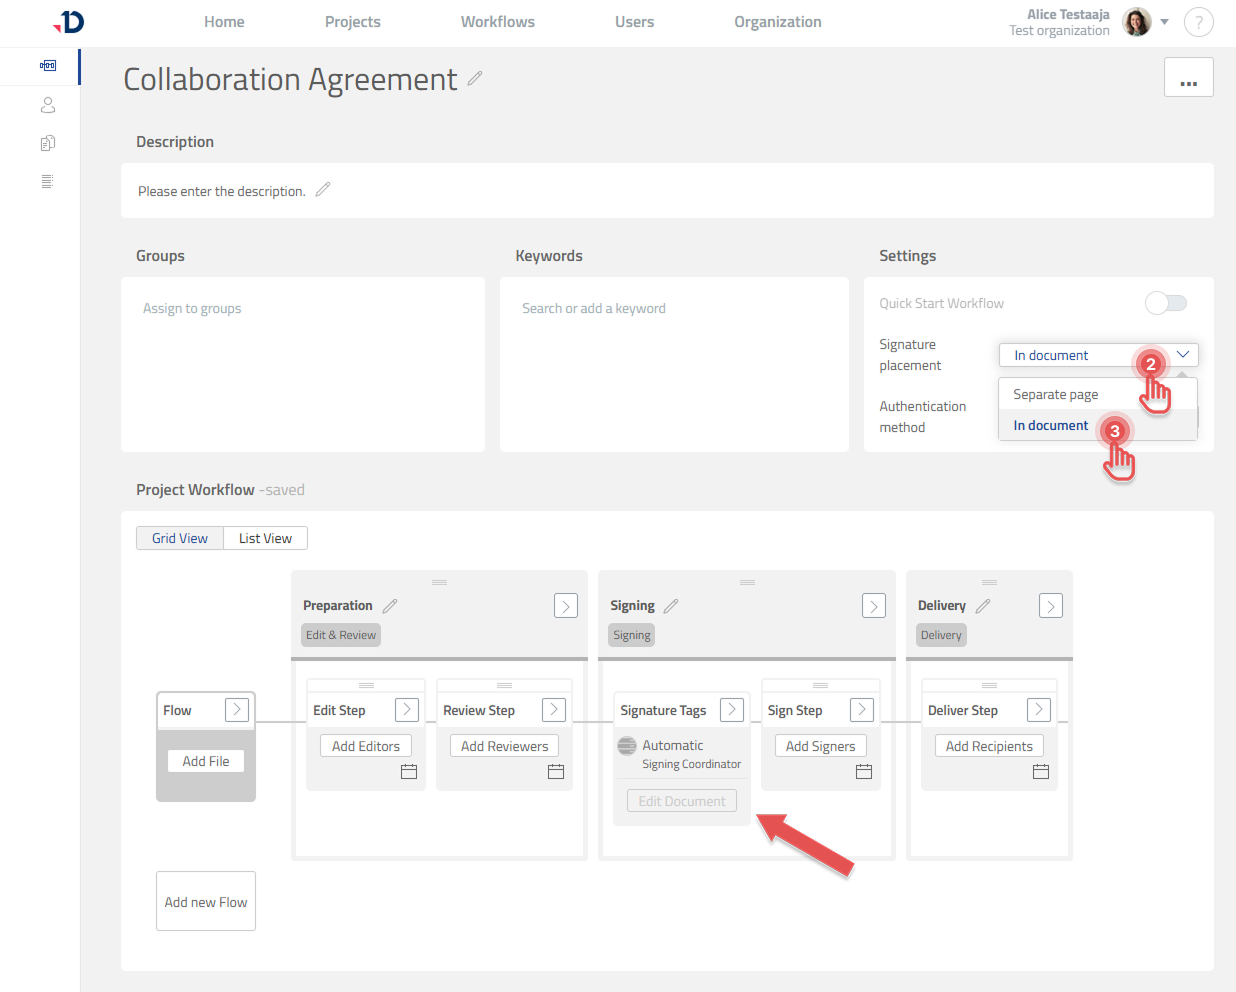
1. Open your Workflow Template.
2. Under Settings card, click “Signature placement” dropdown.
3. Click “In document” option.
4. Notice the new Signature Tags Step added into the Sign Phase.
Signature Tags Step
Signature Tags Step is the checkpoint to make sure a document is ready to be signed.
A document is ready to be signed if the number of Signer Placeholder matches with the number of Signers.
In Signature Tags Step, you are able to:
Choose whether the Task to check the document readiness will be done automatically by the system or manually by a person.
Edit the document and prepare it for automatic Signature Tags placement.
Preparing document for In-document Signature Placement
To prepare a document for In-document Signature Placement, upload the document into the Flow first. And then, depending of its file format:
1. On the Signature Tags Step, click [Edit Document] button.
2. Add Signer Placeholders by clicking [Add signer] button.
3. For each Signer Placeholder, drag and drop their Signature Tags on to the document.
DOCX
Documill Leap utilizes a feature in DOCX file format called Content Control to represent Signature Tags. By doing so, the Signature Tags can adjust their position accordingly when there are changes to the document.
Since Content Control is a feature in DOCX file format, you can prepare it using other text editor, as well as generate the DOCX using Documill Dynamo. Make sure to follow the Content Control definition explained in this chapter: Preparing In-document Signature Placement | Content-Control-Tag-format
If you would like to prepare the DOCX while you are designing your Workflow Template, follow below instructions:
1. On the Signature Tags Step, click [Edit Document] button.
2. In the document, add a placeholder text that will be made as Content Control.
3. Select the placeholder text.
4. Click [INSERT] tab > [Content Control] button > [Rick text] option to convert the placeholder text into Content Control.
5. Click the Content Control label to open its Properties dialog.
6. In the [Tag] field, fill it with below format:
Format:
http://www.documill.com/signature/ooxml/1.0/signer<number>/<signature tag type>

Example:
http://www.documill.com/signature/ooxml/1.0/signer1/signature
Read more about Content Control Tag format in the next chapter.
7. Click [OK] button to save and close the Properties dialog.
8. Repeat for other Signature Tags that are needed in the document.
9. In the right side panel, click [Reload Signers] button.
10. Lastly, click [Save as New Version] button to save your changes.
Content Control Tag format
To make a Content Control to be recognized as a Signature Tag, it needs to be defined with such formatted Tag:
http://www.documill.com/signature/ooxml/1.0/signer<number>/<signature tag type>
signer<number>
This represents the identifier number of the Signer Placeholder. The number starts from 1 and can go up as needed.
For example:signer1,signer2,signer3, etc.<signature tag type>
This represents the information of the Signer. Leap supports below information:
Type | Description |
|---|---|
signature | Signer’s signature. |
fullname | Signer’s full name. |
initials | Signer’s name initials. |
date | The date when the signer signed the document. |
title | Title of the signer in their organization |
organization | The organization’s name of the signer. |
Other file formats
In-document Signature Placement only supports PDF and DOCX file formats. Please use Separate Signature Page to sign other file formats.